")
Noticing more gray hair? If you want a natural, chemical-free way to achieve warm browns or deep black and to cover grays, the traditional two-step henna and indigo method is a solid choice. This approach uses plant powders—henna (Lawsonia inermis) and indigo (Indigofera tinctoria)—to colour and condition your hair without harsh chemicals like ammonia or peroxide. In this guide, we’ll cover the pros and cons, a step-by-step process that suits most hair types, tips for choosing safe powders, and what to consider if you want to try other colouring options later.
Quick summary (for readers in a hurry)
- Henna Alone –> Gives off orange to reddish tones and helps strengthen the hair cuticle.
- Henna + Indigo –> To achieve brown or black shades, start with henna and follow with indigo. This two-step method works best when you pay attention to timing and use pure products.
- Safety first: –> Avoid using any powdered mixes containing metallic salts, PPD, or products labeled as ‘black henna.‘ These additives can trigger severe allergic reactions or result in unpredictable hair damage. Always perform a patch test before full application to check for sensitivities.
Now that we’ve introduced the basics, let’s explore why the henna and indigo method is a popular choice for many seeking a natural way to cover grays.
Pros and Cons: A Balanced View
Pros:
- Natural & Chemical-Free: Henna and indigo are plant-based and free of harsh chemicals like ammonia and PPD.
- Conditions Hair: Henna is renowned for its conditioning properties, which make hair stronger, shinier, and less prone to breakage. It coats the hair shaft, adding a protective layer.
- Adds Volume & Shine: Regular use can give your hair a thicker appearance. Your hair also gets a natural, healthy lustre that synthetic dyes often can’t match.
- Covers Grays Effectively: When used correctly, particularly in a two-step process, henna and indigo provide excellent coverage for gray hairs, resulting in rich, natural-looking brown or black tones.
- Long-Lasting: Henna and indigo colours are durable and fade gracefully, unlike chemical dyes that leave harsh regrowth lines.
Cons:
- Limited Color Palette: While fantastic for browns and blacks, you’re limited to these shades. If you desire blonde, vibrant reds (without an underlying orange tone), or unnatural colors, henna and indigo may not be suitable options.
- Time-Consuming Process: Applying henna and indigo to cover grays is a multi-step process. It can take several hours, including preparation, application, and waiting time.
- Permanent: Henna is a permanent color that cannot be easily lightened or removed. This can pose a significant challenge if you decide to switch to chemical dyes later on, as the results can be unpredictable.
- Can Be Messy: The paste can be quite messy to apply. You will need to take protective measures for both your skin and the surrounding area.
- Difficult to Predict Exact Shade: The final shade can vary based on your natural hair colour, the amount of gray you have, and the quality of the henna and indigo.
- Cannot Lighten Hair: Neither henna nor indigo has bleaching properties, so they cannot lighten your existing hair color.
The Method: Two-Step Process for Optimal Gray Coverage
For best results on gray hair, a two-step process is typically recommended to achieve a rich, brown, or black color.
Step 1: Henna Application (The Foundation)
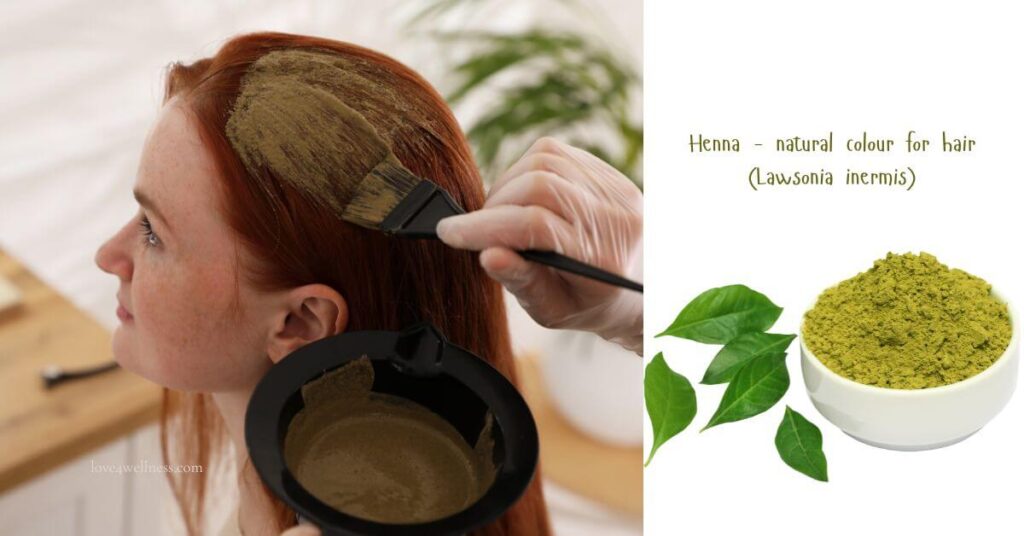
Preparation:
- Mix Henna: In a non-metallic bowl, mix pure henna powder with warm water (or strong black tea/coffee for deeper tones) to a yogurt-like consistency.
- Add Acid (Optional but Recommended): A squeeze of lemon juice, a tablespoon of apple cider vinegar, or amla powder can help release the dye more effectively.
- Dye Release: Cover the bowl and let the mixture sit at room temperature for 6-12 hours (or overnight). You’ll know it’s ready when you see a darker, reddish-brown liquid pooling on top.
Application:
- Clean Hair: Apply henna to clean, dry, or slightly damp hair. Ensure your hair is free of any oils, conditioners, or styling products.
- Protect Yourself: Wear old clothes, gloves, and apply a barrier cream (like Vaseline) around your hairline, ears, and neck to prevent staining.
- Section Hair: Divide your hair into small sections.
- Apply Generously: Starting from the roots, apply the henna paste generously to all your hair, ensuring complete saturation, especially on gray areas.
- Cover: Once applied, wrap your hair with a shower cap or plastic cling film to keep it moist and warm, which aids dye uptake.
Waiting Time:
- Leave the henna on for 2-4 hours. For darker red tones or stubborn grays, you can leave it longer (up to 6 hours).
Rinse:
- Rinse your hair with plain water until the water runs clear. Avoid using shampoo or conditioner for 24–48 hours to allow the colour to oxidize and deepen.
Step 2: Indigo Application (For Browns and Blacks)
Preparation (Just Before Application):
- Mix Indigo: In a non-metal bowl, mix indigo powder with warm water (and optional salt) to a yogurt-like consistency. Indigo dye releases quickly, so mix just before use.
Application:
- On the Hennaed Hair: Apply the indigo paste to your freshly hennaed, slightly damp hair (right after rinsing out the henna). Some people prefer doing the indigo step the next day, but for the best results, it’s important to apply it within 48 hours of the henna application — otherwise, the indigo may not bond properly and the deep black shade won’t develop.
- Protect Yourself: Again, wear gloves and protect your hairline.
- Section & Apply: Apply the indigo paste generously to all your hair, focusing on the areas where you want a darker shade.
- Cover: Cover your hair with a shower cap.
Waiting Time:
- For Brown: Leave indigo on for 1-2 hours.
- For Black: Leave indigo on for 2-3 hours (or even longer for a jet-black result).
Rinse:
- Thoroughly rinse your hair with plain water until the water runs clear. Avoid shampoo for at least 48 hours to allow the indigo to fully develop. You can use a light conditioner if needed after the final rinse.
The two-step process can provide excellent gray coverage and create a rich, natural shade, as many people have experienced.
Choosing the Best and Safest Henna and Indigo to Cover Grays
The market has many brands; purity is key for safety and results.
- Ensure labels state ‘100% Pure’ or ‘Body Art Quality (BAQ)’; this means no metallic salts, PPD, or chemical additives. Such substances may cause severe chemical reactions or trigger allergic reactions. Trust only suppliers who disclose full purity and ingredient details.
- Examine ingredient lists carefully: henna should list only ‘Lawsonia Inermis’ and indigo only ‘Indigofera Tinctoria.’ Any other additives or undisclosed components may pose safety risks.
- Test for Purity (Patch Test): Before applying to your hair, always do a strand test and a patch test on your skin (e.g., behind your ear or inner elbow) 48 hours beforehand to check for any allergic reactions.
- Reputable Brands: Opt for well-established brands that specialize in natural hair care. Get recommendations from trusted users.
Pro Tip: Always buy henna and indigo powder separately and mix them yourself. “Black henna” or “Burgundy henna” often contains metallic salts or PPD, which can be harmful.
Can you use chemical hair dye later (or after) henna?
Short answer: Be cautious. Henna is a strong, permanent plant deposit that can and will interact with chemical dyes.
- Reintroducing chemical colour over henna (or vice versa) can give unpredictable results — odd tones, patchy colour, or even hair damage with some impure products.
- Many professionals recommend completing any chemical processes first, then switching to henna. If you must transition from henna to chemical dyes, wait several weeks and perform a strand test first to ensure a smooth transition.
- Planning to return to chemical dyeing permanently? Then, consult a professional colourist experienced in working with henna-treated hair and conduct a strand test. If you simply want to darken or tweak the tone, consider adding indigo or herbal glosses instead of immediate synthetic dye.
Embracing the Journey: The Reward of Choosing Natural
You’ve now armed yourself with the knowledge of one of India’s most treasured beauty secrets. Yes, covering grays with henna and indigo requires more time and patience than a quick synthetic dye, but consider the tradeoff: you are actively nourishing your hair with every application.
This is more than just coloring your hair; it’s a commitment to natural beauty and hair health. You’ll be rewarded with remarkable shine, deep color, and noticeably stronger hair—benefits that a chemical dye simply can’t match.
Embrace this time-honored tradition. Take the plunge, enjoy the ritual, and let your hair show off nature’s enduring beauty.
Images: canva.com